
New to hatching chicks 🐣? Or maybe you're in the market for better hatch rates with less frustration. For this job, an automatic incubator turns the eggs several times a day for you. It keeps the temperature & humidity stable for healthy chick growth.
You can see the eggs hatch through the crystal-clear window. And cleaning wouldn't and shouldn't be a hassle or super stinky business any more.
Why not enjoy the mama/papa role for the next 21 days with your kids or students? Experience this fun process with successful hatch rates. Many times over.
How Much Does an Egg Incubator Cost?
The small one for about 7 chicken eggs is around $50. The bigger ones with 9-20 egg capacity are from $80-150. Massive hatchers for 40-1000 eggs start from $500 to over $1,000. It's a good idea to budget around $100-150 for a reliable egg incubator, but no more.
Low-Cost Incubators
| Low-Cost Incubator |
|---|
Best Chicken Egg Incubators: Top 2
| Bator | How many chicken eggs |
|---|---|
| The Brinsea | 7-10 |
| The 360 | 22 |
For beginners or families, try the Brinsea Mini. It's fully automatic. For bigger projects, the Nurture Right 360 can give you better hatch rates.
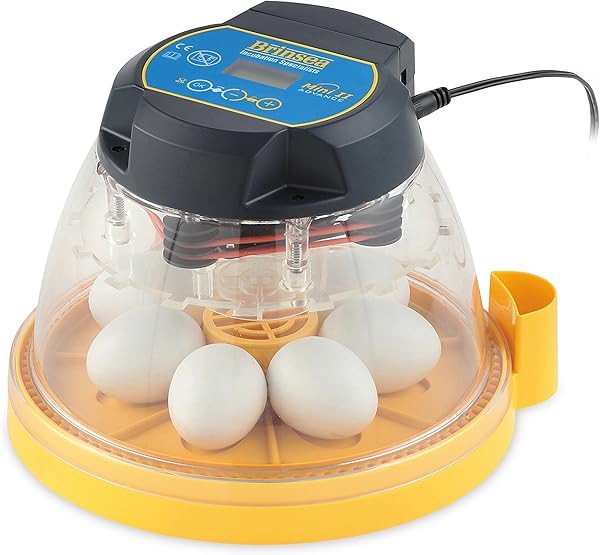
Brinsea Mini (Silver Anti-Microbial)
Small sized, the Brinsea Mini fits nicely on your tabletop. It can hold 7 chicken eggs, 12 quail eggs & 3 bigger duck eggs. This is a good size for small batches as they usually ship 6 eggs in a box.
There are only 3 buttons to fully automate everything–from turning to temperature control. You can turn the auto mode off if you don't need it.
On auto mode, the egg disk turns several times a day & stops 2 days before hatching.
When first unboxing the Brinsea, remember don't throw away that cardboard donut piece. Many folks thought that was just packaging stuff. But it's actually the hatching mat for your chicks from day 19. There's only one so it's best to keep it for later use.
Using this little egg house should be easy as using your phone as we'll see next:
Easy to set up
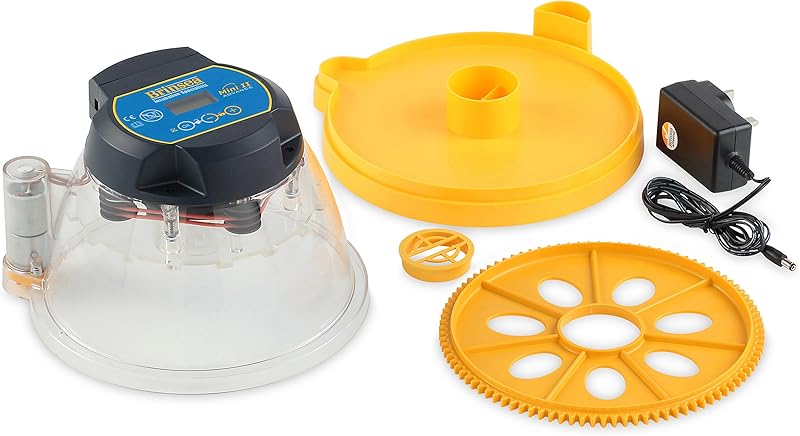
These are all the parts of the Brinsea:
- The dome
- Egg disk
- Water cover
- The base
- Power supply
The plastic is really thick & sturdy to the touch. This means superb temperature stability even in colder surroundings.
Here comes the most exciting moment. After 3-min assembling, you power it on, you hear "Beep beep beep beep".
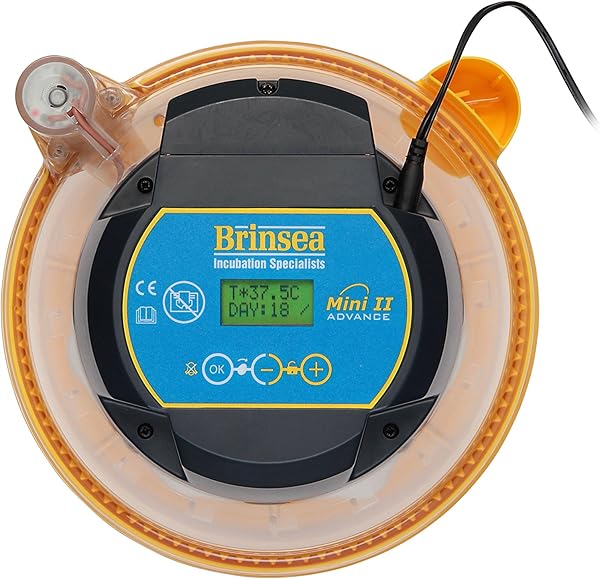
The name of your machine magically shows up: BRINSEA. It then fades out and you see the temperature & day countdown like this:
Setting this thing up is super easy & straightforward. Let us show you briefly, starting with "Press OK for 2 sec to clear the flashing P" in this table below:
| Press | To |
|---|---|
| OK for 2 sec | Clear the flashing P on first power-up |
| Both + and - at the same time | See Temp setting |
| OK now | See the + and - signs on screen |
| The + or the - buttons | Up/down temp at 0.1 |
| OK finally | Save your desired settings |
And voila. With the final step of saving your settings, you're all set. You can change C to F for easier reading. There's a cooling mode for duck eggs as well. If you're incubating these eggs, here are the quick numbers:
| Egg | Temp | Days |
|---|---|---|
| Chicken | 99.5F / 37.5C | 21 |
| Duck | 99.5F / 37.5C | 28 |
| Quail | 99.8F / 37.7C | 16-23 |
Once you're happy, let it warm up for about 1 hour. The little home makes some humming fan sound like "Umm..." now and that's normal. You can place your hand around it to feel it warming up.
Backed by 3-year warranty
You can take advantage of the 3-year warranty that comes with this machine. Enter your bator's number on Brinsea website. It's outside the box, right where it says serial number.
Even after newer models are released, you'll still get continued after-sales support with the models you've got. In fact, many folks can still find spare parts for their 30-year-old Brinsea today.
And bam, in under 10 min, you've set up your egg house ready for some lovely new-born chicks. Woohoo!
Coming up next, let's see:
Beginners' incubating tips with the Brinsea
- Test run the Brinsea for 5-7 days to find the best settings for your local area
- Mark Xs & Os or numbers on the eggs to know they are getting turned
- Keep the Brinsea outside the bedroom as frequent turning can be disturbing
- Store the donut hatching mat somewhere dry & clean (not under the egg disk)
- Get some extra thermometers or hygrometers to double-check
- Press OK and – at once to test egg turning without powering on
- First 18 days: 50-55% humidity
- Last 3 days: 70-75% humidity
For the first few days, test run your bator first to find that 'sweet spot' temp setting. There's no humidity display on this thing. But you've got a simpler-reading mark, like this vertical bar | , in the half-pizza external water tank.
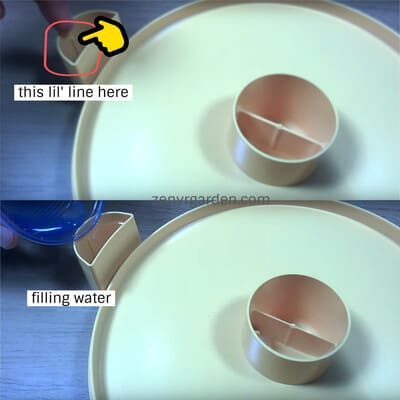
For the first 18 days, keep the water below that bar. This equates 50-55% humidity. For the last 3 days, maintain the water above that bar. This is 70-75% humidity for easier out-of-shell cracking.
It's important to watch out for power outages during the 21-day incubation process. Some folks use the Uninterruptible Power Supply (USP) to keep things stable even during blackouts.
21 Days of Magic
If you're unsure what to do during the incubation process, scroll through this brief timeline to get some ideas. We'll show you 3 big milestones: Day 8, Day 18, and Day 21.
To track your incubation process, download an app called Hatchabatch (free) on Android or iHatch ($2.99) on iOS. It shows the day-by-day chicks growth; like on day 16 of 21, chicks will develop eyelids & tail feathers. It's super fun & useful, especially if you're new and quite forgetful (like us).
After you've got your fresh fertile eggs & test-run your bator, place the eggs in with your desired settings. Let it do its thing.
And now:
On day 8
What we do today is:
| Day | Do | Why |
|---|---|---|
| 8 | - Candle the eggs - Throw infertile eggs |
To see which eggs are fertile |
Here's what candling the eggs looks like:
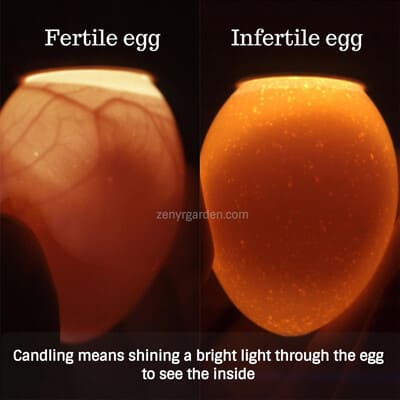
When candling, if you see some blood veins, that's a good egg. If you see no veins & a bright color all around, the egg is not fertile. No chickens will be born from those. So take it out before it rots.
You can use your phone's flashlight or any regular flashlights in a dark room for candling. Some folks candle their eggs every day just because it's such a magical, exciting process. You can do this every 3 days or so on day 11, 14 & 17. If you're sure all of your eggs are fertile, then you may not need candling at all.
Sometimes you'll see that hyper-active little cutie moving & kicking around. It just can't wait to get out. Make sure to space out each opening/closing for at least 6 hours just to keep the temp & humidity nice and good.
After that:
Rolling on to day 18
Today is our Lock Down day:
| Day | Do | Why |
|---|---|---|
| 18 | - Do a final candling - Take egg disk out - Put hatching mat in - Go into lock down |
To check eggs growth |
Now we do a final candling. If everything is good, we go into lock-down mode. Remember to take the yellow egg disk out & put your cardboard hatching mat in.
After this point, we leave the eggs alone. The auto turning should automatically stop tomorrow (day 19). Or you can turn it off manually today.
There's no turning, no disturbing. Fill the water above the bar | to increase the humidity for hatching. We're so close to making it now. Let's wait for the magic.
Count down with us, 3, 2, ...
Happy hatch day!
| Day | Do | Why |
|---|---|---|
| Chicks birthday! | - Don't separate their shells - Transfer to pre-heated brooder - Celebrate |
To not kill them To keep them warm Just for fun |
It's day 21 🐣🐣🐣! You hear chicks peeping & pipping all around (these little guys are loud). Remember, don't try to help the chicks out by separating their shells. Many folks & ourselves have seen the chicks die devastatingly by doing so.
The cardboard donut provides grip for their little feet so they won't trip. Once the feet are dry & they are more fluffy, you can transfer them to a pre-heated brooder.
Trust us, this moment cannot be any more rewarding. Get ready for some cool/fun names ideas for your cuties. You'll absolutely love it!
Hey, but:
Is cleaning up this thing a hassle?
Well, not really. You can use wet wipes, mild bleach water or concentrated disinfection. Just make sure not to use IPA because it might cloud the clear plastic dome over time. Luke-warm soapy water or detergent also works. After that, let your machine dry.
Be extra careful when cleaning the electronic parts. Oh and the plastic dome has some silver-based anti-microbial stuff embedded right into it, which kicks ass those germs with no mercy.
If you need any help with the machine along the way, just call them or drop them an email support@brinsea.com. The folks are responsive & always trying to help. If you lose the gigantic paper manual, here's the online manual.
| The Brinsea Summary |
|---|
| Pros: - Small - Automatic - Easy clean - Clear view - Silver under armor - Eggcellent after-sales support Cons: - Loud turning - Dim screen - No humidity display |
And just like that, you can be ready for your next 98th and 99th and 100th hatch with this bad boy.