Rooting sugarcane in water is incredibly easy. It should take around 5-7 days for new shoots to grow. It also helps preserve your cuttings during winter. When the canes grow up, they will have a super strong root system.
Let's walk through the steps below.
Step 1: Cut Up the Sugarcane Pieces
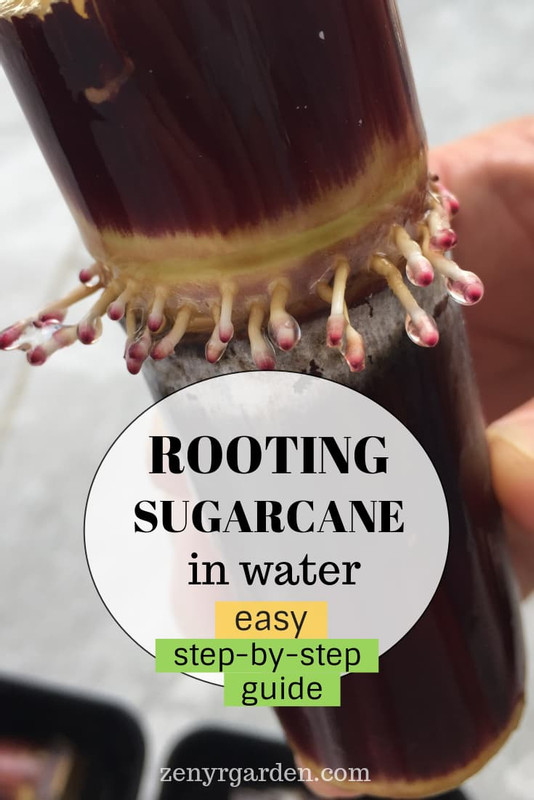
When you get the sugarcane stalks or cuttings, make sure the little buds (aka the eyes) are alive. They look something like this:
/the-bud-and-root-of-sugarcane.jpg?ref=zenyrgarden.com)
From this bud, a new sugarcane plant will grow out. The tiny little dots around the bud are where the roots will shoot out.
This cutting below is not good because the outer bark has been shaved off–along with the buds. You wouldn't choose these as they will not form new plants or roots.
/dead-sugarcane-buds.jpg?ref=zenyrgarden.com)
In a picture you may see below, another kind of bud like that has probably been too dried and turned dark instead of green. I have tried putting it in water for about 6 days.
Although you can see some string roots shooting out, no sugarcane is growing out from the bud. It has been chopped too close to the root ring. You can see the comparison results here:
/dead-bud-good-bud-sugarcane-compare.jpg?ref=zenyrgarden.com)
So don't go for dried, dark-ish dead bud like these. And don't cut too close to the cane root rings (the dots around the cane).
If possible, try to get the top part of the cane. This is where it has a lower sugar content, which could demotivate the ants to come. Also, the top part has very good growth because of a hormone called auxin. I believe it triggers new bud growth. Despite this, the rest of the stem is also fine for propagation by cutting.
You don't have to do the following but you could chop the cane into smaller 1-bud pieces. Some say this helps it grow faster with a stronger root system. Some folks leave several 2-4 buds on one portion and that's fine.
/cut-sugarcane-into-portions.jpg?ref=zenyrgarden.com)
And here we have it:
/preparing-sugarcane-cuttings-for-planting.jpg?ref=zenyrgarden.com)
After this, we can:
Step 2: Put the Cuttings in Water
/put-thecane-in-water.jpg?ref=zenyrgarden.com)
You can lay the cuttings straight up or flat down. Here I use non-chlorine water to help with the microbial activity (if any). I fill it just a bit over half-way up the canes.
And the final step is:
Step 3: Place the Container in Partial Shade & Let's Wait
/place-sugarcane-in-partial-shade.jpg?ref=zenyrgarden.com)
After placing the container in a semi-shady place, you're basically done with the prepping for rooting. Now we just need to wait to see the magic happen.
Updates & Observation Notes
The First Week
Day 1: Sit the canes in water. Put in semi-shade.
/day-01.jpg?ref=zenyrgarden.com)
Nothing much going on on day 1. The buds are green.
Day 2:
/day-02-sugarcane.jpg?ref=zenyrgarden.com)
Buds change from pale green color to more purple. Water level drops. I add some more water to the container–about half way up the cuttings' bodies.
On side view, the little buds are now protruding a little bit.
/day-02-bud-poking.jpg?ref=zenyrgarden.com)
Moving on to:
Day 3: The magic is happening
/day-03-sugarcane-protruding-bud.jpg?ref=zenyrgarden.com)
/day-03-morning.jpg?ref=zenyrgarden.com)
/day-03-afternoon.jpg?ref=zenyrgarden.com)
Day 4:
/day-04-buds.jpg?ref=zenyrgarden.com)
When you turn the pieces around, you'll see these:
/day-04-sugarcane-roots.jpg?ref=zenyrgarden.com)
Today is my first time seeing sugarcane roots! They are so exquisitely beautiful. The tip of the root is violet with a white string body. So those little dots around the cane are where the roots shoot out. This is truly magical to my beginner's eyes.
I notice some ants hovering around the pieces. They bravely jump into the water to enjoy some sweet juice. I guess it might have been the yum-yum stuff the roots extrude out. They do gather around the pieces with more roots more from my observation. The bottom water-touching part of the pieces is also quite slimy.
What a memorable day. I am so in love with this rooting thing.
Day 5:
/day-05-morning.jpg?ref=zenyrgarden.com)
Buds growing taller. More roots are also growing. In the afternoon, they have grown this much:
/day-05-afternoon.jpg?ref=zenyrgarden.com)
We're almost there!
Day 6:
/day-06-sugarcane-taller.jpg?ref=zenyrgarden.com)
Growing taller! Different buds have different growth rates. Some are faster than others. There may be one bud that may not make it. It's the last one in the lower right in the pic above.
The roots are thinner and longer:
/day-06-roots.jpg?ref=zenyrgarden.com)
Finally:
Day 7:
/day-07-biggest-cane.jpg?ref=zenyrgarden.com)
Look how much taller it gets in just one day. This is our biggest guy for sure. This guy here is still tiny but he's doing fine:
/putting-adenium-inside-the-box.jpg?ref=zenyrgarden.com)
/day-07-tiny-guy.jpg?ref=zenyrgarden.com)
I also got rid of this one because chances of sprouting seemed low:
/day-07-bye-bye-guy.jpg?ref=zenyrgarden.com)
And there we have it! It's a super easy process I hope you guys will enjoy getting started.
Month 1:
/sugarcane-month-one.jpg?ref=zenyrgarden.com)
Month 2:
/sugarcane-month-two.jpg?ref=zenyrgarden.com)
/stem-of-sugarcane-month-two.jpg?ref=zenyrgarden.com)
Month 3:
Missed it unfortunately :(
Month 4:
On Month 4, I notice that the plants slow down a bit growing vertically. Their stems get thicker and fatter.
/sugarcane-month-04.jpg?ref=zenyrgarden.com)
/sugarcane-month-04-leaves.jpg?ref=zenyrgarden.com)
Hooray to see new young branches:
/sugarcane-month-04-new-young-shoots-sprouting.jpg?ref=zenyrgarden.com)
I also notice some white stuff at the base. There seems to be some roots stringing out. I guess it could be the mealybugs or some natural white wax of the sugarcane.
/sugarcane-month-04-base-white-stuff.jpg?ref=zenyrgarden.com)
I chopped off some old yellow leaves today (22 Jan) for tidiness, and according to some, it helps with the plants' growth.
Responses to Readers' Questions
If all sugarcane buds totally dip in water what happened
--> Thanks for your question. So I heard from other growers, we only dip half way or not totally full so that the buds don't go bad. From my limited experience, when dipping in too much water than the cane itself can take, after a few days it will start to give off a slightly sour smell (like that of fermenting, but you'll know it may have gone bad). There will be some insects flying around, landing on the canes. Interestingly I notice that although the roots grow out, the buds as you may have guessed don't grow in this case. And the water where the canes are dipped turns quite cloudy.
This is the green sugarcane I was experimenting with:
/cloudy-sugarcane-in-water.jpg?ref=zenyrgarden.com)
Close-up: As you can see, the water level does not even get to the buds part, but it has already started to show the signs of not taking. I reduce the water the next few days, but it seems that germination doesn't take.
/close-up-sugarcane-cloudy.jpg?ref=zenyrgarden.com)
This is just one variety of sugarcane. I guess you can experiment a small amount of your own to also see the results. I hope this helps! Merry Christmas :)
Share or pin this post!