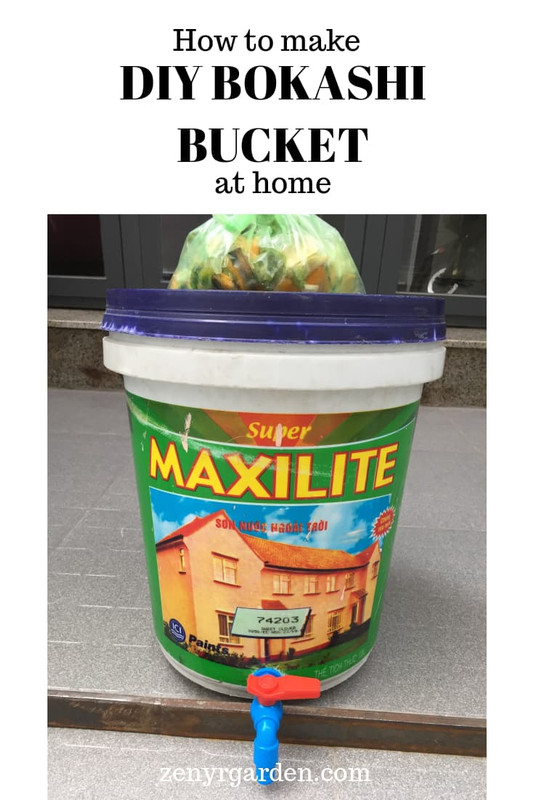
The three main components to make a DIY bokashi bucket are a bucket, a strainer, and a valve. When attaching the valve to the bucket, we just need to make sure there is no leakage.
The rest of the process is super simple to do. It may not need any electricity or heavy tools. And should take approx. 20-30 minutes. The total cost is less than $5 bucks.
Let's jump in on the fun and see some ideas to get started.
Materials:
- 5-gallon bucket / 18-20L paint bucket
- Water valve
- Strainer
Helper tools:
- Knife
- Marker pen
Here are the steps next, we can begin with the first one, which is:
Step 1: Mark the Size of the Valve on the Bucket
/bokashi-step-01-mark-the-size.jpg?ref=zenyrgarden.com)
First using a pen or marker, mark around the water valve size on the bucket.
Then:
Step 2: From the Marked Circle, Cut the Opening Hole for the Valve
/bokashi-step-02-cut-the-valve-hole.jpg?ref=zenyrgarden.com)
To cut the hole, you can use a knife and work it through. Depending on how thick your bucket is, this process may take longer or faster.
This step takes the longest amount of time in the process if you're doing it with a knife tool. To speed things up you may use a drill.
While cutting, scoop around the circle a few times to make sure the valve fits snugly. Get rid of the little pieces that fall out after you're done.
Step 3: Hook the Valve Onto the Bucket
/bokashi-step-03-hook-valve-on.jpg?ref=zenyrgarden.com)
To make sure there is no leakage, you can wrap some Teflon tape (or plumber's tape) around the neck of the valve. To be extra sure, you can fit another pipe to the opposite side of this valve. The two provide pressure on both sides to make sure it's water-tight. And with this, you are basically done constructing the bokashi bucket.
/final-bokashi-bucket.jpg?ref=zenyrgarden.com)
Next Step: Filling the Bokashi Bucket Up
As we are done creating our bokashi bucket, all we need to do every day is:
Dumping food scraps in:
/step-01-put-food-waste-in.jpg?ref=zenyrgarden.com)
Scooping some EM:
/step-02-scooping-some-EM.jpg?ref=zenyrgarden.com)
Sprinkling the EM onto the food:
/step-03-sprinkling-the-EM.jpg?ref=zenyrgarden.com)
And voila!
Think of a bokashi bucket like a human belly.
This makes it easier to understand what food to put in. And remember to keep the 'belly' dark and warm.
Some Updates on the Bokashi Bucket
We've been adding food scraps to the bucket–mainly fruits, veggies, egg shells. The smell is slightly sour. It gives me that kind of "ugh, um" re-action but it is not too bad. Looking inside the bucket, I see some beautiful white mold developing.
/white-fuzz-developing-in-bokashi.jpg?ref=zenyrgarden.com)
After adding in some grapefruit peels, I notice that the contents smell quite nice and sweet. No houseflies have been buzzing near. No rats or other insects have been near the bin. Although I did spot a few ants here and there, they are insignificant in number. I'm very happy with the progress so far.
After making some homemade EM (effective microorganism), I tried it out in my bokashi bucket. You could make your own EM from the yogurt whey liquid. It contains millions of lactic acid bacteria. I mixed the EM with 10 parts water. In this bottle is the basic beneficial LAB.
/whey-water-mix.jpg?ref=zenyrgarden.com)
With this, we can add a few mists of some good microbes into the bucket.
/spray-em1-in-bokashi-bucket.jpg?ref=zenyrgarden.com)
From what I've seen so far, there is no foul smell, no black mold and not too many ants around. There is some white mycellium growing.
If you're interested, I'll show you:
Check it out later!
One Week After Lid Shut Closed
After the bucket is full, we shut the lid closed. This is what it looks like inside after one week in:
/update-bokashi-bucket-one-week-after-lid-closed.jpg?ref=zenyrgarden.com)
It is this beautiful white fuzz developing. I am pleasantly surprised to catch this sight. Feels like white Christmas has come early to our house.
And the smell seems like it's rushing out when we open the lid. Quite strong but it dissipates quickly. It must be because I have not strained the bottom liquid out as frequently as I should have.
Let's wait for another week. We may see some more magic happening.
It has been quite a while. Today we open the bokashi bucket and get some juice:
/getting-bokashi-juice.jpg?ref=zenyrgarden.com)
The smell is not the most pleasant one. It's kind of like that of some strong-smell fermented food. It's not too bad. The bucket now looks like this. It kind of sinks down I think:
/bokashi-bucket-result.jpg?ref=zenyrgarden.com)
We put a layer of soil in a box, then pour the bokashi contents in, and finally cover it with a top layer of soil. If you have a backyard, you can bury it right into the soil.
Some also call it trench composting, where you make trenches and pour the bokashi contents in. This is to let it further compost for another 4 weeks, I believe. And we're basically very much done with our bokashi process!
/further-composting-for-bokashi.jpg?ref=zenyrgarden.com)
The only thing we're left to do now is wait. And once we get there, we'll post the results to share with you.
Bokashi is Done
After about 5 months (I know quite some time but), I opened the bokashi box. And most of it has turned into soil! Unbelievably beautiful, the process of transformation.
/bokashi-done-first-time.jpg?ref=zenyrgarden.com)
The heavy smell has gone. Some remnants of egg shells are still visible. But, as you can see, the batch is quite watery. It must be the fruits that I added in.
From this I learned:
- Extract out the bokashi juice every 2-3 days
- A bucket so we can more easily see/feel the liquid level
- Use enough green to brown to balance it out
But for the first batch, I am very happy with this. I'm going to let it dry out a bit. Then apply the done bokashi compost soil to my adenium plants.
Have Fun DIY Your Bokashi
There are many different ways to go about making a bokashi bucket. Hopefully, this post has sparked some ideas for you to get started with composting.
I had fun making it with my dad. Enjoy & share your creations! Until then, cheers and See you again here next time.
>> You may want to check out:
There are many more fun ways of composting to check out. You can see one here if you'd like:
Goodbye! See you again next time.
Share or pin this post!