To make a good black soldier fly love cage, we can measure out the space, the enclosure materials, the density of flies, etc. Let's see some ideas to get started.
A quick first note: A love cage for black soldier flies is a place for them to mate and lay eggs. In some design, people also place the hardened black pupae in the cage. So it serves a third purpose as a place for pupation.
Now let's see what material to use to build the bsf cage:
Aspect #1: Material
A smaller-opening mesh screen is better for the walls & roof of the cage. With a bigger-sized mesh, the female flies may be able to poke through and lay her eggs randomly in the net. Once she lays her eggs in that place, others may follow. Because the smell signals to them that that is a safe spot for eggs.
The tighter the aperture, the lesser the air movement around the cage. It helps retain the smell of the attractant for a few more days. Also, it helps keep some humidity inside, which could extend the life span of the flies. A good screen may also block big water droplets to slip through.
A Grower Asks Then: Can Mosquito Net Be Used?
Be on the cautious side with mosquito netting. In some places, they treat mosquito netting/window net with insecticides or toxic chemicals to prevent malaria. These chemicals kill your flies when they come into contact with it. Growers have experienced the loss of flies because of it. So watch out for those.
If the net is free of insecticides (you can see on the package), then it's fine to use. You can also use fiberglass mesh screen which won't rust.
A good temperature for the love cage is around 85F (29C). Avoid using materials that retain quite a bit of heat. Together with the constant flying activity (which generates lots of heat) of the flies, it can get overly hot.
Greenhouse films may not be ideal because they are mostly designed to trap heat in colder weather & don't usually give good airflow. This may be useful in the winter season however when the flies need some warmth.
A lighter-colored material can help reflect the light out more evenly. It's easier to see what's happening inside the cage. A good net also allows adequate lighting for mating & egg laying.
For maintenance, choose a material that's easy to clean or can withstand some insect-safe cleaning agents. A roll of 50m (165ft) mesh screen at any hardware stores can be had for about $100. Choose a durable one that can last you years during the rainy, windy or sunny weather if you're placing the cage outdoors.
If you're using softer netting which has a tendency to droop down over time, make sure to hang all the corners tight & straight. The drooping down or creases can create some kind of a small bag.
When a lot of flies buzz & land into this pouch-like crease, it can create a heat issue with the stacking up onto each other problem. Some flies might even get stuck. It can make it hard for some pupae (if left on the ground) to pupate out into flies.
The stacking-up in one creased corner of the netting looks something like this:
/crease-in-mosquito-netting-bsf-breeding-cage.jpg)
Compared to the droopy netting above, this is a better set-up & very manageable:
/good-bsf-breeding-cage.jpg)
You can use some fabric to shade out the light around these droopy corners, which discourages the flies to flock there. It's better if we hang the netting straight from the beginning. Overtime, if some leaves or branches of near-by tree fall onto the netting, you may need to straighten it up again. Also, if you have chickens near by, be careful of them poking holes through the net. Use a double-layered structure or elevate the cage up the ground to keep the flies safe & sound.
As you can see in the green breeding cage above, the base is not directly touching the ground. This spacing layer or gap is intentional by design. It helps keep the thermal balance & provides air flow for the cage. This means it won't get too hot in the summer & won't get too cold when the temperature cools down.
Alternatively, you can place the four legs in four buckets containing kerosene oil or black oil. This helps keep the insects, especially the little ants, away from the cage.
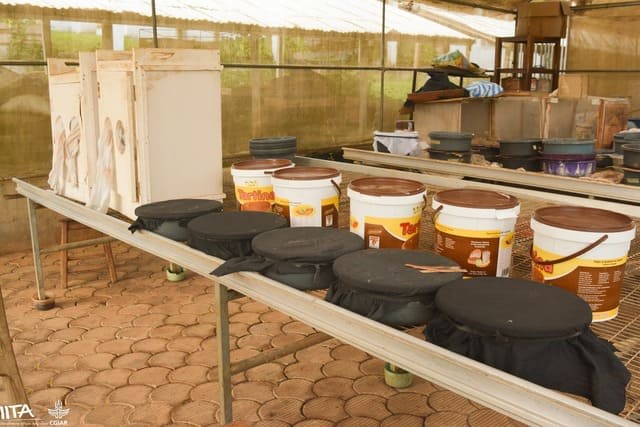
You can see more cage designs here. These images are kindly shared by Martin (Ento Organic Farm). Thanks!
/cage-design-01.jpg)
/cage-design-02.jpg)
/cage-design-03.jpg)
/cage-design-04.jpg)
/cage-design-05.jpg)
/cage-design-06.jpg)
The next aspect in making your good BSF love cage is:
Aspect #2: Density
A good density for the flies is about 6000-10,000 flies per 1 square meter. In other words, if you build a 6 sq.meter cage, you can put in about 10-20 kg of pupae ready to turn into flies. The daily input can be about 0.5 - 1.25 kg of darkened pupae. For a smaller estimate, the max you can go is about 40 heads per 10 cm square.
A dense population may reduce chances of successful breeding and may actually turn out counter-productive. It confuses the flies or they may not get enough space for each one of them.
BSF is a creature that sometimes mate in mid-air & the constant buzzing around of too many flies may interrupt the event. The denseness can create some real heat problems or death when the flies stack onto each other to get a share of light in the cage.
Now we can move on to do some lighting and shading:
Aspect #3: Light & Shade
BSF love early morning light. The time between 9am to 1pm is best for mating. The temperature helps warm their bodies to get into the right reproductive mode. A love cage with about 60% light and 40% shade is good for the flies & pupae. If you're doing this indoors, try some breeding lights. In some labs, fluorescent lighting that runs 24/24 is sufficient.
Also, make sure the lighting is good for the four faces. Meaning, it's not way too dark in one corner & way too bright in the others. The flies will be naturally lured into the brighter corners. As they do, the density of flies in that space will consequently increase. Some growers have experienced fly death because of this stacking up. There are cases where some pregnant flies didn't get a chance to lay their eggs.
You can tell by the carcass (dead bodies) of old flies falling down on the floor of the cage. If they're clustered up in one place, it means the love cage design does not provide evenly spaced out lighting around the cage. We may then need to tweak it here & there.
For example, you can choose a position that's not blocked by surrounding objects or near a window. If it's too bright, hang a dark piece of fabric to cover it up. When you see that the dead fly bodies are scattered quite evenly around the cage, then you know the lighting is good.
In a 2-in-1 love cage design (pupation + breeding), the pupae that you put in can be placed in a more shaded corner. This helps them not to get too shocked by an environment change. They don't need light yet at this point & prefer some shade. Some people put them in a separate dark cage & connect it with a tunnel to the love cage hooked with lights. As they pupate, they will naturally be lured to the light source.
The other place we can provide shade is above the attractant box. The female flies love hanging around under the shade to lay eggs. The males are okay with the light above. Good shade in that location can help them lay more eggs more frequently.
Speaking of eggs, to attract the females to lay eggs where you desire, you can prepare some:
Aspect #4: Attractant
The other purpose of a love cage (besides getting the BSF to mate) is to provide a safe place for the females to lay eggs. The smell of the attractant attracts the female flies to deposit her eggs. She wants food for her babies, a shaded corner to keep them from being eaten by predators (like ants) & keep the eggs from drying out.
The problem with some attractants that growers find is that the smelly smell doesn't last for the time they need (7-8 days). So they had to replace them a few times, which can be quite a hassle.
To get a smelly, long-lasting attractant try mixing in some rotting fish fins or the dead bodies of black soldier flies. It's good if you ferment them 4-5 days prior to using.
In your breeding cage, find a spot where it's not too windy. The wind may blow the smell away which makes it last for a shorter time. This is also when a smaller-opening net can help retain the smell for longer.
In some bigger cages, like up to a room size, people place the attractant boxes in the four corners, where it's less windy and more shaded.
Also, don't change the stuff in your attractant too frequently. The flies may get used to the old smell of that stuff. Let it age & let them enjoy. Some people find that the new food doesn't seem to be as attractive as the old one that the flies have grown to be used to & love.
If you need to go mega on the smell, put some new attractant on the surface & keep some of the old attractant beneath. Don't pour the old stuff all out for a drastic replacement. Too frequent change may disturb their enjoyment. Also, make sure the moisture is good. It helps with the egg laying because the moisture signals to the mother flies that there's good condition for the babies to survive.
Here is one attractant box design:
/gap-around-attractant-box.jpg)
As you can see in the above picture, this is not a very good attractant box design. It has a sort of neck or collar which leaves a good dark gap for the flies to find and lay eggs randomly there, not our desired places. There is also some gap between the box & the ground.
Very ideally, look for some container with a flat top surface & four little short legs somewhat like the blue box below. The space under the box, created by the four legs, will help with thermal balance. They'll keep the flies laying eggs on the spot we design for them.
/plastic-box-for-attracting-bsf.jpg)
Also, check for:
Aspect #5: Egg Collectors (Eggies)
To attract the flies to lay eggs, you can use some wood stacks, corrugated cardboard pieces or aquarium bio-balls. The gap between the wood pieces around 0.8-1 mm is wide enough for the flies to deposit eggs.
But the gap should not be too wide either because that might discourage the flies to lay eggs there. She may be afraid that the eggs may fall out or the gap is too wide to hold them in place. Before laying eggs, the female always use her tail to 'survey' or scan the depth & width of the area.
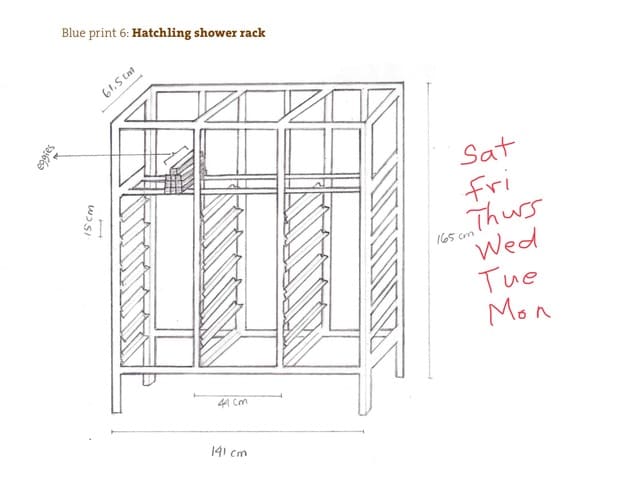
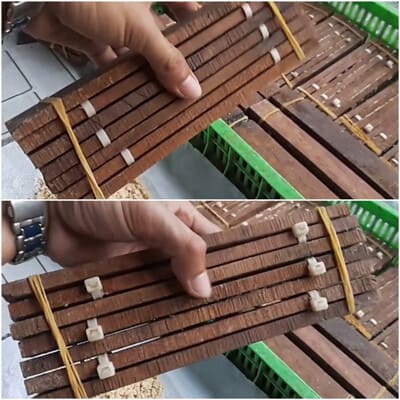
People often tie the wood pieces with rubber bands or color-coded ties (each color for each day of the week the eggs are collected). To make the gap between the wood pieces, you can hit 2 nails on the end of a piece & 1 in the middle. For a stack of 5 wood pieces, sandwich in 2 nailed pieces. This will help create good spacing in between the sticks.
Here are both sides of an egg collector:
/both-sides-wood-egg-collector.jpg)
Some people use double-sided tape to space out the wood sticks. Although this material is relatively cheap, over time or many uses it tends to flatten down. So the fluffiness of the tape and the gap is closed, making it hard to get the flies to lay eggs there. Over time, you can see the tape flattened down. It looks something like this:
/front-side-view-double-sided-tape-on-egg-collector.jpg)
Some other good ideas for spacers are:
- 2 drops of hot glue
- Zip ties
/zip-tie-wood-egg-collector-stack.jpg)
- Nails
/nailed-wood-egg-collector.jpg)
This style has 2 long nails going through the pieces. Then, we secure them in place using 2 bolts. The spacers between the wood sticks are some little wood pieces on the sticks.
/both-sides-of-wood-piece.jpg)
You can screw & unscrew the wood stack using this little tool. It's quick & easy:
/unscrewing-the-wood-stack-egg-collector.jpg)
The downside to sanding your wood stick surface less rough is it may not soak in moisture as well as the rough one. The good thing about making the surface flat is that it's easier to collect their eggs. It's good to choose good quality wood because low-quality wood tends to dry or gets curved up over time, possibly making the gap bigger.
Place the egg collectors adjacent to your attractant. The mother flies will lay eggs on the wood pieces & not directly on the food source. When the baby larvae hatch, they will fall down to get their first food. Again, place some shade over this area. This could be an aluminum sheet, a basket or simply some burlap.
If you use wood sticks, don't sand the wood surface too much. Let it be what it be. A smooth wood surface may not absorb the moisture content as well as the rough-faced one.
To increase the effectiveness of the egg collectors, people soak these wood stacks in sugary water or fermented foods for some days. It helps with the smell & the moisture. So the wood stacks themselves act as a kind of attractant.
Here is a quick video about wood egg collectors:
How to make Wood pieces on which Flies lay their eggs | Vy's FarmTo know what to do with these eggies after the female flies have deposited their eggs in, you might want to read on this post next 'How to keep black soldier fly population uniform':

A grower also asks: Is There A Wood BSF Prefer Better to Lay Their Eggs On? We've presented the answer here in this post:

When maintaining your BSF love cage, you'll often have to sweep out the BSF carcass (or dead bodies). Here is one little tip a grower shares for:
Collecting BSF Dead Bodies
When collecting the BSF dead bodies in the cage, be careful not to accidentally sweep away the living flies that are carrying eggs. Some people do the cleaning every 3 days for bigger cages to keep the space (clean and clear) manageable.
When they do this about 6-7 pm in the evening, they've noticed a decrease in the egg yield or fly population. From this observation, it may be the accidental sweeping of the living flies that are resting on the pile.
So they change the collecting time to 6-7 am in the morning, which seems to work better & keeps the population more stable. This is when natural sunlight may not get to the growing area yet, so there's not a lot of activity going on yet in the fly cage. It's safer doing it this way to ensure a stable population for mating.
One last thing to look for in your BSF love cage is:
The Male/Female Flies
To tell the difference between male vs. female flies, we can look at their abdomen color. The color on the top of the female's abdomen is quite reddish, whereas that of a male BSF is more bronze. The male flies are usually bigger than the females.
Here you can see more clearly the difference in their genitals. The male have a more round claw-like structure. The female have a split end like a fork or scissor structure. When they mate, the male's claw-like round part grabs & sucks the female's tail in and pumps the juice or sperm for fertilization.
/male-female-black-soldier-fly-genitals.jpg)
Let's have another look here:
/male-vs-female-black-soldier-fly-comparison.jpg)
We can see the ending tail of the male fly is a bit more round & slightly more plumb:
/male-soldier-fly.jpg)
From another view, we can see the female tails:
/male-female-black-soldier-fly.jpg)
When the female is ready to mate, she will stretch her tail out. This is why light is important for mating. It helps the male flies see the signal & get ready for action.
Very sorry to these two lovely creatures though. To help make the comparison, a grower had to take one of their wings off so they won't fly away. Aww. Thanks for your sacrifice oh dear flies.
So when you see them mating the next time, you'll be able to tell which is which:
/black-soldier-flies-mating.jpg)
You can see the egg laying event (1:50 - 2:03) very clearly here. It never stops fascinating us. Ah & watch the tail closely.
From one grower's experience, she noticed that if we leave the hardened black pupae in the shade for about 10 days before putting into the breeding box or love cage, we can get some more female flies. Or basically, when the temperature is cooler, there seems to be more female flies born.
Although this is not conclusive or ground-breaking scientific finding, it seems to suggest that the pupation temperature may (or may not) affect the gender of the flies born. Female like it a bit more cool while the guys like it a bit warmer. Whether the temperature can determine the bsf sex or not, this does pose an interesting direction for exploration.
And finally:
Have Fun Setting Up the Love Box!
Hope this post has given you some ideas to get started. If we keep in mind some common mistakes before getting into it, we can save time & money making the same mistakes and needing to change the design from time to time. Have fun exploring & please if you like share your set-up. We'd love to see your cool creations. See you next time.
Credits
Share or pin this post!


